Milestones Professional is a tool for creating presentation-ready project schedules from scratch or
using project data from other software like Microsoft Project, Oracle Primavera, and Excel.


Create Presentation Reports in Minutes
Milestones Professional makes planning, organizing, communicating and tracking projects fast and easy. Designed for anyone who spends time scheduling or managing projects, Milestones Professional makes fast work of scheduling efforts. Project managers who need to put together presentation ready project schedules will find Milestones Professional to be a scheduling software product that is truly a joy to work with.
Highlight your Project’s tasks using a huge assortment of presentation-ready bars and symbols
Most project management software offers an assortment of display options, but Milestones Professional’s huge built-in assortment of symbols and bars is second to none.
As many as 500 individual project milestones can be added to any task row on the schedule. They can be stand-alone project milestones or can represent project start and end dates.
Strategically place bars or symbols on single task row or use the eleven vertical levels within a task row.


Show your Project’s key dates with built in and customizable date ranges
Milestones Professional large array of headings allows tracking of projects by minutes, hours, days quarters and years as well as custom time spans. Features like fiscal year options, colorizing and logarithmic views provide pinpoint project tracking for top level presentation.


Give a clear concise one-page report of your Project by adding columns, legend, Datagraphs, baseline, status, and more to your schedule
Add up to 20 columns that can contain text, values, built in or customized calculations, and or indicators.
Emphasize a task using symbols, or color Indicators.
Set-up 1 to 3 Datagraphs to track costs and resources. Datagraphs can be displayed as lines, bars or points.
An added Legend gives meaning to symbols, symbol-bar-symbol combinations and indicators on a schedule.
Define task symbology with customizable symbol text and symbol notes.
Use built-in Summary options to show lower-level information then rollup for top-level reporting.
Use built-in Baseline options to hold your project to its schedule.
Use built in Status features to show and track the percent complete of each task and the entire project.
Add customizable Freeform text anywhere on the schedule.

Top Level Reports in Minutes for MS Project & Primavera
The nice thing about Milestones Professional is that it can make you a hero. That’s right. When you put the power of Milestones to work, you’ll transform Microsoft Project, Microsoft Project Server, or even Primavera schedules into attractive, persuasive, executive-level presentation reports that get noticed. And get you noticed! And don’t worry about making changes to your schedules. When your project schedules change (which they often do!), you can choose to “refresh” the presentation schedule with the latest dates from Microsoft Project or Primavera.
Create a variety of reports from Microsoft Project and Primavera files
In Minutes generate a one or more-page prestation report with Milestones import wizards for Microsoft Project and Primavera. The wizards offer a variety of built-in templates, a Step by Step guide for personal selection of the information to be imported then allows those imported schedule to be customized and the saved style appears in the wizards for future importing.
Swimlane and Master Schedule presentation reports are a breeze with Linking and Coded import options. These presentation reports can be built from a single file or multiple files.


“Refresh” the presentation schedule when Microsoft Project or Primavera dates change
The Milestones Professional file generated from Microsoft Project or Primavera can be updated using the Milestones Professional Refresh option.
Refresh will update dates, text, columns, status and more. Refresh results provides a report of updated items and an optional highlighted date change schedule view.


View MPP, XER, XML files in Milestones Professional GUI
No need to have Microsoft Project of Primavera installed to view the information in an MPP, XER or XML file with Milestones Professional Quick View. Quick View interprets the MPP, XER and XML files information displaying it in the Milestones Professional’s format or as a text file.

Turn a Spreadsheet into a Project Presentation Schedule
Getting schedule information into Milestones Professional from just about any other Windows software package is easy. Simply copy information from another application to the Windows clipboard, and then paste into Milestones Professional.
When the spreadsheet changes, Milestones Professional Refresh feature updates the Milestones Professional schedule highlighting the changed dates.

Manage Large or Multiple Projects
Use a variety of Milestones Professional connectivity features to manage all aspects of large or multiple projects!
Master schedules:
Merge two or more sub-schedules into a single master schedule to get a top-level view of multiple projects. Simply update the master schedule to see the latest sub schedule information.
Symbol links between schedules:
Manage multiple projects through symbol linking. Base the date of a symbol on a different symbol in another schedule or the same schedule.
Use Hyperlinks on your schedule:
Any symbol or task row on the schedule can have hyperlinks to other schedules, documents or Internet web pages. Once linked, it’s possible to open the objects with a click of the mouse.


“At a Glance” Reporting
With Milestones Professional, it’s easy to instantly get the “big picture” and see how your project is progressing. Easily add stoplight indicators, percent-complete pie charts, and status symbols to any project schedule. Using these, you’ll see “at a glance” the exact status of your project. At last, you’ll be where you’ve always wanted to be. In complete control of your project!
Display a wide variety of indicator symbols using a Stoplight SmartColumn. Stoplight SmartColumns offer a quick and easy method for adding stoplights, with no setup needed.

Display Cost, Earned Value, and More
Earned Value Management is an extremely useful project management system that combines schedule and cost performance. It was designed to help you answer the important question: “What did we get for the money we spent?”
Milestones Professional can give you the answer. Fast. You see, Milestones can add costs, calculate earned value, and present these and other important numbers in a variety of handy formats.
Built-in Earned Value (EV) calculations
Produce reports showing Earned Value, Planned Value, Actual Costs, CPI, SPI, EAC, and EVMS fields using user-entered values, calculated values, imported values from MS Project, or a combination of these options.
Calculation/Indicator SmartColumns
Perform mathematical (+, -, X, /) on values which are entered into columns for tasks on the schedule. Optionally display an indicator (like a stoplight or a % complete pie) for easy insight into key project metrics.
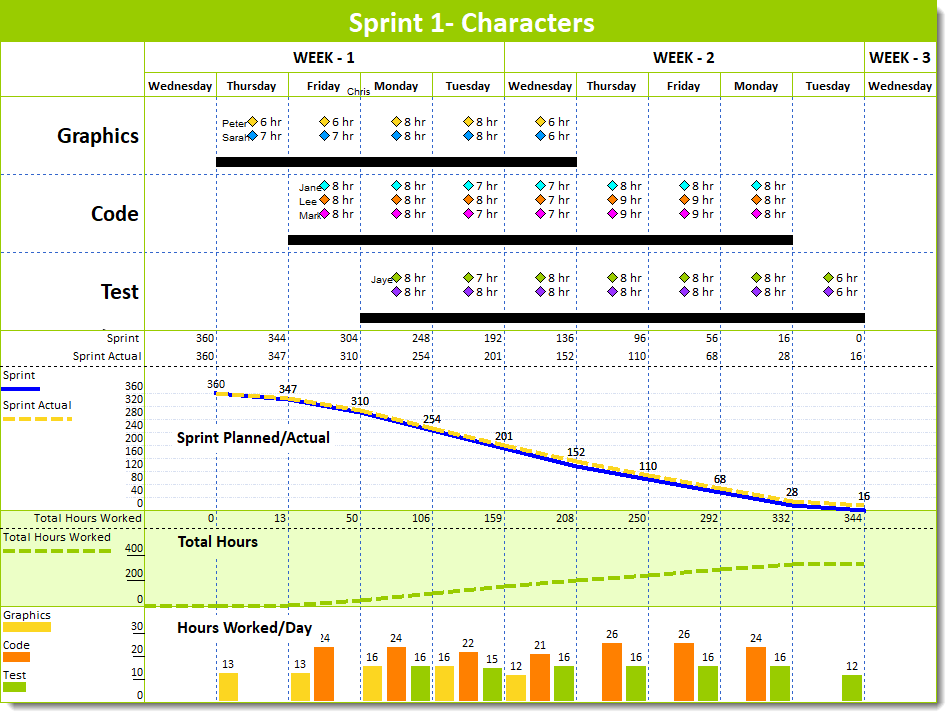
DataGraphs and ValueSets
DataGraph feature allows time period views of dollars, manhours and other values in a project management presentation schedule. Values can be graphed on individual graphs or on the same graph for easy comparison. Milestones Professional variety of DataGraph and ValueSet design elements enhances the schedules visual, for easy understanding of your project’s values.

Share Your Reports with a Single Click
Good news! Milestones Professional offers many ways for you to quickly and easily share your reports

- Send the actual schedule to a colleague. (They can view it with their software or with our Free Milestones Viewer!)
- Create a PDF of your report and share it with a click of your mouse.
- Save your schedule as an HTML page (which can include hyperlinks to other schedules). You can then share the HTML page with anyone you like.
- Publish a complete hierarchy of schedules for Internet/Intranet use.
- Copy all pages of the schedule to PowerPoint.
- Include the schedules in other documents, such as PowerPoint, Word, Excel, and other Windows documents.
Example Schedules created with Milestones Professional